Introduction
A blog website can be created in numerous ways. In fact, there are so many platforms and guides out there, that it can become a pain even knowing what to choose. Although this guide might seem like it’s only adding fuel to the fire (it’s quite long), my goal is to document my entire process, and hopefully shed some light on this topic, at least for future me.
This article is also available in a condensed format.
Overview
Different Approaches
When creating a blog, there is a range of options you can choose from, going from very user friendly to very technical:
- Write on a Blogging Platform: you can just create an account on a blogging platform like
dev.to,substack,medium,hashnode, evenTwitter/Xand write directly there, without even having your own website. This is the easiest way to get started, and you can do just fine building an online presence. You get out-of-the-box support for many features like subscriptions, newsletters, comments, or payments, plus increased visibility for your blog. The downside is that you may be limited to the blogging part, and miss other sections of a proper website, like showcasing your portfolio. Also, you may feel like you don’t really own your content/space. - Use an Online Site Builder: Use a visual site builder (WYSIWYG) such as WordPress, Wix or Squarespace. For example, you can create a
WordPressaccount and manage everything on their platform. This includes choosing a domain name, selecting a site theme, configuring comments support, setting up an email account, adding plugins (e.g. for e-commerce) and so on.WordPressis very powerful and remains a solid choice if you’re not concerned about the technical details and want to get up and running quickly. - Manage Online Services: Manage multiple online services and link them together. This means dealing with a lot more choices (and headaches), but ultimately, you gain a deeper understanding of how things work under the hood. Plus, you have greater flexibility in choosing the services you use and how they work together. In the long run, this opens the door for a more advanced control of your website.
- Manage Servers: An even more advanced option is to configure and manage your own machine and web server. While this path is very interesting for learning purposes, you may end up spending more time maintaining the servers rather than focusing on the content of your wewbsite.
There are advantages and tradeoffs to each option, so what you choose is ultimately up to you. As a software engineer, I personally knew I had to take one of the more technical paths, but also don’t get caught up into detailed maintainance, so the natural option was to find an online stack of services and hope that they would work together seamlessly. After some attempts, I found the right solution for me (for now). In this guide I am listing all services and tools I am using for running this site, which makes this tutorial intended for a more technical audience.
If you’re interested in different approaches in creating a blog, check out some of the many guides:
- Visual:
- Technical:
Steps Overview
The main steps for creating the website:
- Website Infrastructure Setup
- Domain Registration: Choose a domain registrar and purchase a domain name for your site (e.g.
myawesomedomain.com). - Web Hosting: Select a web hosting service. Often, this can be the same provider that offers domain registration.
- DNS Configuration: Point your domain name to your web hosting service’s DNS servers.
- SSL Certificate: Acquire an SSL certificate and activate it on your domain. This is usually available through the domain registration service.
- Version Control: Create a GitHub repository and push your website’s code/content to it.
- Repository Hosting: Connect your GitHub repository to your web hosting service.
- Domain Registration: Choose a domain registrar and purchase a domain name for your site (e.g.
- Website Development
- Web framework: Choose a programming language and a web framework to develop your website.
- Site Layout: Design the layout of your website, including the home page, blog, and any other pages you want to include.
- Website Features: Add any components you want to use, such as a comments section, newsletter signup, or e-commerce.
- Content Writing: Write your blog posts using a text editor and the Markdown syntax.
I will detail these steps a bit later in the article, but for this guide I am keeping the focus on the first part, which is setting up the infrastructure.
You’ll probably also need to setup a CMS (Content Management System), but that’s out of the scope of this tutorial, just because I am not using it yet. As I’m updating the blog, I will be updating this guide as well.
Technologies
Technologies Overview
I use the following resources to create and host this blog:
- Namecheap — the domain registrar, where I purchased the domain name (
andreinvent.com) and the SSL certificate. - Netlify — the hosting service, where the website itself is stored and served to the visitors
- Astro — the blog engine and site generator, which transforms the source code and posts into the html/css files of the website
- GitHub — the platform where the source code of the website and all the blog contents are stored
- Markdown — the syntax used for writing the posts
- Visual Studio Code — the text editor I use for writing the website source code and the posts content
Let’s go through the above technologies one by one.
Namecheap
Namecheap is a well-known domain name registrar that offers a wide range of affordable domain registration, hosting, and management services. Namecheap also provides additional services like SSL certificates, privacy protection, and email hosting.
Alternatives
- GoDaddy: A popular registrar known for its vast array of web services, including domain registration, web hosting, and website building tools.
- Bluehost: While primarily a web hosting provider, Bluehost also offers domain registration services. It’s often chosen for its integration with WordPress hosting.
- Hover: Specializes in domain registration and email hosting, known for its clean, straightforward interface and strong customer privacy policies.
- Squarespace Domains: Squarespace, having acquired Google Domains, now offers domain registration and hosting services with features including free SSL, WHOIS privacy, and a spam-free parking page.
- Dynadot: A registrar known for its affordable pricing and additional services like web hosting and SSL certificates, with a focus on user privacy and security.
Netlify
URL: https://netlify.com
The neat thing about Netlify (though many others services offer this feature) is the ability to connect it directly to your GitHub repository, so whenever you push a change to your repo, Netlify builds and deploys the changes automatically to your live website. As a result, you don’t have to worry about triggering a build manually after editing parts of your website: they just happen in the background.
Alternatives
Alternatives to Netlify include:
- GitHub Pages — A free web hosting service provided by GitHub, ideal for hosting static websites directly from a GitHub repository. It’s particularly well-suited for project, personal, or organization sites.
- Vercel — A platform for frontend frameworks and static sites, built to integrate with your headless content, commerce, or database. Vercel offers great support for Next.js projects and is known for its ease of use.
- AWS — Amazon Web Services offers a range of static website hosting solutions, including Amazon S3 for basic hosting, CloudFront for CDN services, AWS Amplify Console for web apps, Elastic Beanstalk for application deployment, and Lightsail for virtual server management.
- DigitalOcean — This is a cloud infrastructure provider that offers easy-to-use and cost-effective cloud services. DigitalOcean is particularly known for its simplicity and being developer-friendly, with a focus on small to medium-sized businesses.
- Linode — Linode is a cloud hosting provider known for its high performance and good customer support. It offers a range of services including virtual private servers and is suitable for businesses of all sizes.
Astro
URL: https://astro.build
Astro is a popular new JavaScript web framework that allows you to create content-driven websites. It is very easy to use, setup and customize, and produces fast-loading websites, which makes it an ideal solution for static websites like blogs, portfolios, or landing pages.
Astro can use Markdown or MDX for the content language (the blog posts you write), and any front-end framework for designing the site UI, like React, Vue, or Angular. Its flexibility lets you even combine multiple frameworks on the same page.
Tutorial
The official astro tutorial is dedicated to building — you guessed it — a blog! It is very well explained, and it keeps you engaged with periodic quizes. The tutorial is well organized into sections, and it keeps track of your reading progress, so it’s easy to read it over many sessions. I highly recommend going through it!
Themes
There are many astro blog themes available online.
Most of them are free, and provide the source code and a live version to play with, so you should have no problem in finding the right one for you.
The astrofy theme for example offers many colorscheme options and multiple sections, including a blog, portoflio, resume, RSS feed, even a basic online store.
Alternatives
There are many alternatives to Astro, using different programming languages and approaches:
- jekyll: “Transform your plain text into static websites and blogs”
- ghost: “Independent technology for modern publishing”
- gatsby: “Start building amazing web experiences”
- hugo: “The world’s fastest framework for building websites”
- 11ty: “Eleventy, a simpler static site generator”
Each one of them has its advantages and is probably better suited for your particular needs or technology stack preferences.
GitHub
URL: https://github.com
GitHub requires no presentation for anyone who’s ever done software development, but if you’re new to this, it is the standard solution for storing your source code online. You store all of your files in a repository, which can be public or private, and every change you make to them is tracked and can be easily referenced. Multiple people can work on the same files at the same time, which is invaluable for professional teams, but the same features can be beneficial for individuals as well.
Alternatives
Popular alternatives to GitHub are Bitbucket and GitLab, but GitHub is by far the most popular one.
Markdown
URL: https://www.markdownguide.org
Markdown isn’t a tool of its own, but a language specification that allows people and other tools to write and interepret formatted text using a standardized syntax. The syntax is clean, and easy to write direclty in any text editor, whithout needing a dedicated one.
Alternatives
- MDX: MarkdownX, a variant of Markdown that allows to embed JSX (think React components) into Markdown. I will use this format in the future.
- Plain text: You could write your posts using plain text, but that would soon become too limiting
- HTML: You could also write your posts using html, but that’s too cumbersome to manage and type.
Visual Studio Code
URL: https://code.visualstudio.com The text editor and IDE for writing the posts and developing the website.
Alternatives
Too many to list, but here are some of the most popular ones:
- Atom: A hackable text editor for the 21st Century
- Sublime Text: A sophisticated text editor for code, markup and prose
- Vim: A highly configurable text editor built to enable efficient text editing
- PyCharm: The Python IDE for Professional Developers
- WebStorm: The smartest JavaScript IDE
- PhpStorm: The Lightning-Smart PHP IDE
Setting Up the Services Stack
Getting the Domain Name
This is the name of your website, what your visitors enter as the URL (google.com, or andreinvent.com for this site).
Buying the domain name should be straightforward on any of the domain registrars listed above. Actually, the most difficult part is finding a name that meets these 3 criteria:
- you like it
- it is available
- it is not too expensive (the price depends on the domain name extension, so you have some flexibility here)
Once you find the name, you can choose to buy it for 1 or more years, and you can also enable automatic renewal when it expires. Pay attention to the renewal price, as it may be much higher than the initial one.
Enabling HTTPS
In recent years, secure website connections have become the norm, so even if you think you won’t need to enable HTTPS connections, your website won’t be easily accesible or visible in search engine results.
In order to use HTTPS, you need an SSL/TLS certificate, which is what the hosting server uses to encrypt the communication with the clients.
Each platform has its own procedure for requesting, installing and managing the SSL certificate for your website, but of course, I will only explain the steps I took.
Obtain a Certificate
You cannot create your own certificate, you need to purchase it from a certificate issuer, which is a trusted third party. I acquired my certificate through Namecheap from Comodo PositiveSSL, and I went for a multi-domain certificate valid for 5 years. This lets me use the same certificate for multiple (sub)domains (each subdomain requires its own certificate, so if I ever decide to create the subdomains blog.andreinvent.com and projects.andreinvent.com, I will need a certificate for each one).
I find the certificate to be quite expensive, more than the price of the domain name in my case, but as I said, it’s a necessary expense. There are probably ways to get it cheaper, but I didn’t want to spend too much time on this.
Generate a Certificate Signing Request (CSR)
In order to obtain the certificate, you need to provide some information to the certificate issuer. This information is given as a CSR file, which contains information about you, your organization, and the website.
Normally you can have this file generated for you by the hosting service, but you can also do it directly on your machine using openssl. Running the command below, you can generate the CSR file and the private key associated with it:
openssl req -newkey rsa:2048 -keyout yourdomainname.key -out yourdomainname.csrYou are asked to specify some details including:
- A password to protect the output private key file
- Country name (2 letter code)
- State name
- Locality Name
- Organization Name
- Organizational Unit Name
- Common Name
- Email Address
After this is done, you are left with two files:
yourdomainname.csr: the CSR file you will have to upload to the SSL certificate issuer. Based on this file, the resulted certificate will contain the information about your website, location, and organization.yourdomainname.key: the private key associated with the certificate. This key must be kept secure at all times, and never shared, though you will have to upload this to the hosting server a bit later.
Activate/Install the Certificate
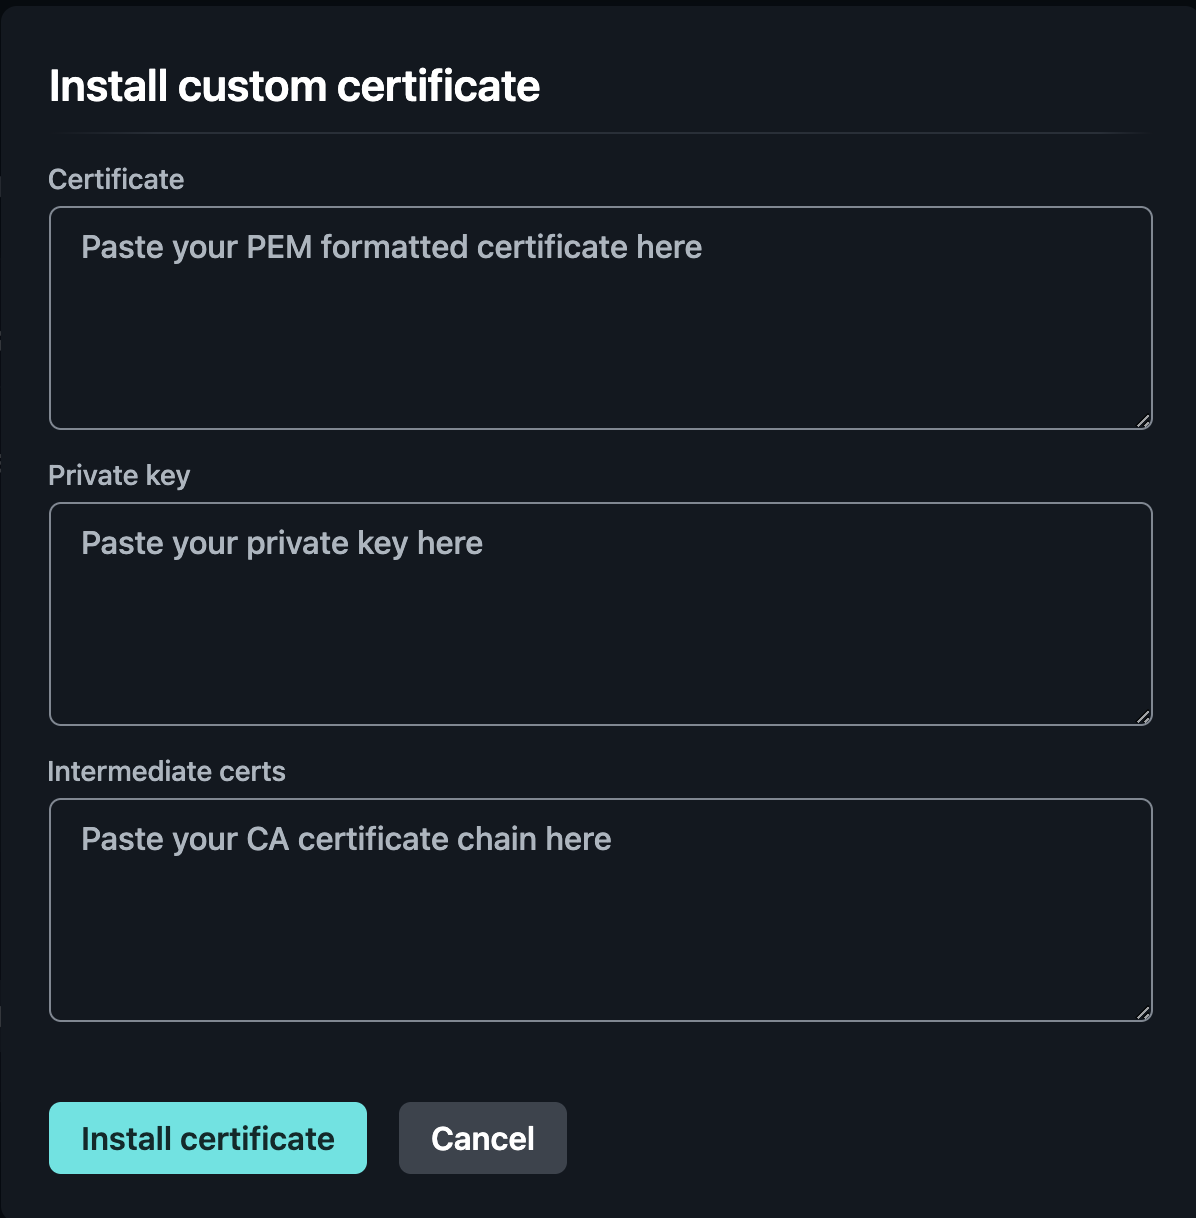
Add the Private Key to the Hosting Server
In order to use the certificate, the hosting server must know some details about it. Most notably, it must know the private key that was used to generate the certificate, which allows the server to decrypt any message that was encrypted using the public key of the certificate. Without this step, the server cannot create secure connections with anyone, since it won’t understand any of the messages it receives.
So I went over to Netlify and navigated to site settings, then Domain management > HTTPS > SSL/TLS Certificate and pressed the Update custom certificate button.
Connecting the Domain Name to the Hosting Service
In order to connect the website name (andreinvent.com) to my hosting service (Netlilfy), I had to register the DNS of the hosting service (Netlify) to the domain name registrar (Namecheap). This means that an association is made between the site name (andreinvent.com), and the gateway to the server where the site is hosted (e.g. dns1.p02.nsone.net).
As a result, whenever the website name is requested by a client, the global DNS service knows how to redirect the client to the hosting server.
That’s almost it. If you followed my steps and can access your website using your domain name, that’s great! But there’s still something to do, which is…
Developing the Website
Version Control
I use GitHub for storing the source code of the website, and all the blog posts. This is a great way to keep track of all the changes, and to collaborate with others.
Website Development
This website started by following the Astro tutorial, which is a great resource for learning the basics of Astro and Markdown. You can start the same way, or use one of the many themes and customize it to your liking.
There is a separate post about developing the website itself, I am keeping this guide focused on configuring the list of services that are needed to run the site.